Twitter Facebook RSS Bloglovin Pinterest Instagram Image Map

Tuesday, July 30, 2013

Herb Kitchen Wreath

  photo wreath.jpg

Pin It!

**This post was featured at The Tumbleweed Contessa!**

Finally, something to fill the blank space above my wall ovens!
A wreath, a wreath, a glorious wreath :-D
This is not a proper, step by step tutorial,
but I hope you will get some ideas and inspiration all the same. 
Let's go! 

I stalked wreaths online for ages
 and decided I wanted something that had a thrown-together,
French Provincial herb and fruit sort of look. 
 Makes sense for a kitchen, right?
However, everywhere I looked, these suckers were HIGH!
Ever want something so bad, but the price just turns you off?
You know what that means - DIY time
I bought a grapevine wreath form at Goodwill for $1.50.
At Dollar Tree, I bought 2 faux fruits (red apple, red/yellow pear),
and one bunch each of orange poppies, purple daisies, and deep red carnations. 
There, I spent $6. Total: $7.50. Woo woot!

I already had the green faux pear, orange pumpkin, grapes,
 eucalyptus, green berries, green flowers, cinnamon sticks, and raffia. 
I was therefore able to decrease some of my craft hoard stash, too!
Don't you love the feeling you get when you realize
you already have the perfect thing?

When I looked at the herb wreaths online, 
I noticed that many of them had some type of spiky herb or twig
that flared out from the edges in a spiral.

 photo Inspiration3.jpg
Farmers' Market Herb Wreath @  Houzz.com
(Gorgeous, but $99.95 - ouch!)

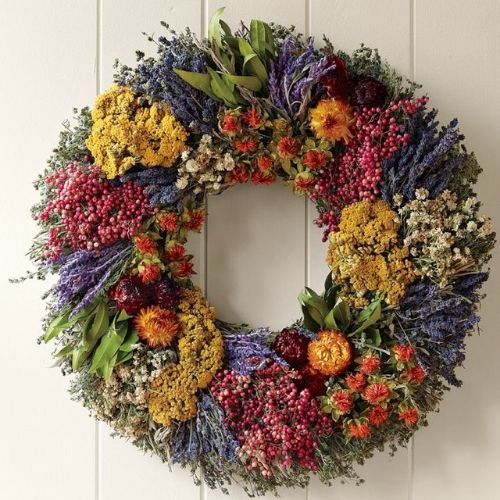
This was my favorite one, with its bunches of eye-catching flowers and colorful herbs,
but I wanted something with larger "bursts" of color and incorporating fruit.

So this is how I started: I arranged pieces of eucalyptus and the green berries
alternating around the outside edge and angled each 
so they formed the same spiral pattern.
This had an added benefit of making my wreath seem a little wider.

  photo wreath_edge.jpg

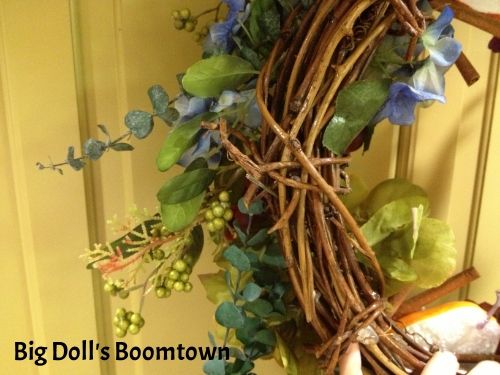
Once I was happy with my arrangement, I hot glued each stem in place. 

My next step involved the faux fruit. 
My initial plan was to somehow hot glue each fruit to the wreath, 
but when I held them up there, they stuck wayyy out 
and I realized it would be hard to get the glue to hold the round surface to the wreath. 
My solution was to cut the fruit in half longways!
(It's made of styrofoam.)
Everything but the grapes got this special treatment.
I used a serrated knife for this process, slow and steady. 
I ran into a problem with the green pear (which I'd had a few years),
because it actually had a ROCK inside it for balance and stability! 

 photo pear_rock.jpg

Can you believe it? It was purchased at Dollar Tree, too, 
but I guess they eliminated this feature from their fruit at some point 
because none of the newer fauxs had rocks inside them.
I just scored the pear along the line I needed it to divide at, 
and cut around the rock as best as I could.
I was lucky that when I pried it apart, it broken evenly.
*whew*
 As a bonus, I have fruit halves left over for a project another day.

Things look better in groups of odd numbers,
which was why I chose 5 fruits/veggies. 
I arranged them on the grapevine wreath in sort of a star pattern,
and made sure none of the fruits with similar colors were next to each other.
Once I was satisfied, I hot glued those suckers into submission --
all but the grapes, which I attached with twist-ties at 2 spots (top and bottom)
directly to the wreath.
 
I didn't want flowers next to fruit that were the same/similar colors.
Without contrast, the wreath would be boring. 
So the orange flowers couldn't go next to the pumpkin or red/yellow pear,
the green flowers couldn't go next to the green pear,
and the red and purple flowers couldn't go next to the grapes or apple.
I moved things around until I found the right combo,
cut my stems to the proper length (I used a wire cutter), 
and hot glued them in securely. 

At this point, my wreath was technically done, but I felt it was lacking something.
Do you ever feel this way when you craft?
Hmmmm ...
I had fruits, I had herbs, I had flowers, but what I didn't have were spices.
After a quick brainstorm, I realized I had a gazillion cinnamon sticks
that would be perfect! 

  photo cinnamon.jpg
Got these at Dollar Tree around Christmas time.

I made 4 bundles of 2 sticks each by hot gluing them together in an "X"
and then tying a bit of raffia in a bow over the glued spot. 
This was to add texture and also because I am addicted to bows ;-)
Then, I spaced them evenly throughout the wreath and glued them down. 
 Now it's finished.

 A 3-M Command Hook was the perfect solution for hanging this wreath
over the cabinetry that surrounds my wall ovens. 
I just placed it at the inside edge of the right side door
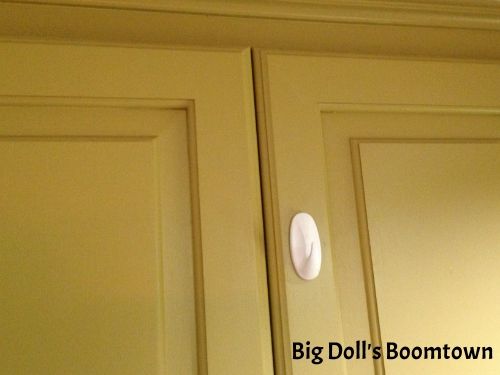
(since DH and I are right handed and that door will have to be opened first from now on)
and made sure it was high enough that the handles were easily accessed.

 photo command_hook-1.jpg
At first I worried that the wreath would get knocked down and be a pain in the tail, 
but we adjusted quickly to it being there and it's not fallen once! 

Wanna see how it looks hanging over the ovens?
I'm gonna pretend to myself that you said YES!

 photo wall_ovens.jpg

Not too shabby for $7.50, huh??

My kitchen is coming along slowly but surely -- thanks for being along for the ride.
I love to have you visit me, and I'd love even more if you'd FOLLOW ME!
Links for Facebook, Twitter, Bloglovin', RSS, Instagram, and Pinterest are at the top center :-)

I'm linked up to these amazing parties -- go check out the wonderful ideas shared!

Met Monday @ Between Naps on the Porch
Amaze Me Mondays @ Dwellings - The Heart of Your Home
Make It Pretty Monday @ The Dedicated House
Mod Mix Monday @ Mod Vintage Life
Inspiration Monday @ twelveOeight
Masterpiece Monday @ Boogie Board Cottage
Creative Bloggers' Party @ Homemaker on a Dime
What'd You Do This Weekend @ Recipes and Ramblings
Inspire Me Tuesday @ A Stroll Thru Life
The Scoop @ Cedar Hill Ranch
Get Your Craft On Tuesdays @ Today's Creative Blog
Terrific Tuesdays @ Adventures of a DIY Mom
Get Your Craft On Tuesdays @ Today's Creative Blog
TOO cute Tuesdays @ Funky Polka Dot Giraffe
One Project At A Time @ A Bowl Full Of Lemons
Tuesday's Treasures @ My Uncommon Slice of Suburbia
Anti-Procrastination Tuesday @ New Nostalgia
Fluster's Creative Muster Link Party @ Fluster Buster
Lil Luna Link Party @ Lil Luna's
Cast Party Wednesday @ Lady Behind The Curtain
Wonderful Wednesday Blog Hop @ Ducks 'n a Row 
Works For Me Wednesdays @ We Are That Family
What's It Wednesdays @ Ivy and Elephants
 Penny Pinching Party @ The Thrifty Home
Whatever Goes Wednesdays @ Someday Crafts
We Did It Wednesday @ Sew Much Ado
Show and Share @ Southern Lovely
Catch a Glimpse Party @ A Glimpse Inside
All Things Thursday Link-Up @ All Things With Purpose
Thrifty to Nifty @ A Jennuine Life
Time Travel Thursday @ The Brambleberry Cottage
Open House Party @ No Minimalist Here
Thursday's Treasures @ Recipes For My Boys
Hookin Up with HoH @ House of Hepworths
Thursday's Treasures @ Chocolate Chocolate and More!

Monday, July 22, 2013

Use What You've Got

***If you aren't a follower already, 
check out my pink "Follow Me" tag top and center! 
Click on any of the icons to find 
and follow my profiles on social media!*** 

It was fun telling you about how I hang laundry to dry,
but it's time to return to my kitchen and show you some updates!

When I began my quest to decorate my kitchen on a budget, 
I felt excited and ready to tackle the blank canvas in front of me.

Free is the least expensive option there is, 
and I set a priority to spend my money sparingly 
on "stuff" since I already owned quite a bit. 
I suppose the overall theme for my kitchen's decor is 
"light traditional with a touch of whimsy,"
and I mostly just wanted things in there
that would be functional and make me smile. 

Here are some examples of ways I have achieved this goal.
I have had these items a while, but I am one of those people
who can remember what something cost forever,
so I included that info (and where I bought things) in the pics.

 photo vignette_pic.jpg

I got the idea to set up a vignette in this deep corner from Sheila at Note Songs.
She is always creating really cute and inviting displays
with things she already has in her own kitchen corners, and I love the effect.
Sheila often uses trays or cake stands to add height to her vignettes, too.
I have owned these items for years, and they are so cute together. 
I especially like how the round plate and curves of the pitcher 
break up all the squares and angles in my kitchen. 

 photo mineral_water_bottle.jpg

The bottle is pretty nifty -- I did some research on it, 
and it originally held mineral water from Virginia Etna Springs Co. in Vinton, VA.
It's hand blown, the color is called apple green, and the shape is called ten pin. 
It's roughly a hundred years old, if what I found online is accurate.
Regardless, I love to imagine how it ended up here in Arkansas!

 photo range_T.jpg

If you'll remember from my original Aviary planning pic, 
I eventually want to paint these walls aqua 
and cover this little bit of backsplash with PVC pressed tin.
Well, I haven't yet pulled the trigger on painting (I'm not usually this chicken!),
and I originally thought just one sheet of PVC pressed tin would be necessary. 
However, after I measured, I found it would require 2. 
My Home Depot sells the 18" x 24" sheets for $20 each -- 
 photo bermuda_bronze.jpg
Pic courtesy of Home Depot. 

I am not ruling this out, because I do think the texture and metallic look would be amazing, 
but $40 is more than I want to spend on any one thing right now.
In the meantime, I have this large "T" initial propped on the small ledge, and I like it quite a bit. 

 photo spice_rack.jpg

This wine box is a holdover from when my kitchen had a grape theme.
I like the height it gives this little area, and I may repaint it eventually. 
It's really close to the wall color, and a spark of color here would be nice. 
I just don't know what or how I'd redesign it! 
If I paint the wall behind it aqua, that might not even be an issue.
The little pot of flowers gives a nice spark of red.
I've seen some disdain towards faux flowers online, but I still love them. 
And it's my kitchen ;-)

Now for the window area!

 photo DSCF4010.jpg
My original plan was to have the pitcher of hydrangeas here.
After I spray painted my canisters, I found I wanted them on the windowsill instead. 
My hydrangeas are still homeless for the moment.
I got the idea to hang things on the inside of the window from a blogger 
who doesn't seem to be blogging anymore -- The Happy Homebody.
I loved looking at Angie's ideas because her kitchen was arranged nearly identically to mine!
Anyhow, these little floral plaques bring in two of my favorite colors, red and purple,
both of which are present in the kitchen rugs that served as my inspiration.

 photo window_pics.jpg

On the other side, I have a daisy-shaped hook that serves the function
of keeping my dishcloth handy and letting it dry.
Wet dishcloths left to sit on a counter top gross me out! 

 photo window_hook.jpg

The Waverly valance hanging on a tension rod right now
is just sort of a "place holder" -- I still have plans 
to get my mother to help me make a valance with burlap
and lots of colored fabric to better tie in my kitchen rug.

 photo sun.jpg

Here comes the sun! Love the Beatles :-)
This friendly terra cotta gent originally came
from the outdoors section, but he's so warm (ha!)
and inviting that I prefer to have him inside.
A 3-M Command Hook is securely attached to the window trim,
so that he can hang without holes going in my woodwork.

 photo command_hook.jpg

Hopefully these ideas will get you thinking about
stuff you already own and new ways to use it.
Rearranging and trying things in different rooms only costs time!
 And who knows -- you might just surprise yourself when you shop your closets ;-)
I don't know which part I like better: making my kitchen cute for free,
or the storage space I reclaim when things are used instead of stashed away.
That, my dears, is a win-win.

Next time, I'll be sharing a cute and colorful DIY craft
that has brought a lot of color and texture to my kitchen,
and for less than $10!

Pin It!

This post linked to parties at:

Amaze Me Mondays @ Dwellings - The Heart of Your Home
Met Monday @ Between Naps on the Porch
Mod Mix Monday @ Mod Vintage Life
Masterpiece Monday @ Boogie Board Cottage
Creative Bloggers' Party @ Homemaker on a Dime
What'd You Do This Weekend @ Recipes and Ramblings 
The Scoop @ Cedar Hill Ranch
Inspire Me Tuesday @ A Stroll Thru Life
Terrific Tuesdays @ Adventures of a DIY Mom
TOO cute Tuesdays @ Funky Polka Dot Giraffe
Tuesday's Treasures @ My Uncommon Slice of Suburbia
Anti-Procrastination Tuesday @ New Nostalgia
Get Your Craft On Tuesdays @ Today's Creative Blog
Penny Pinching Party @ The Thrifty Home
What I Whipped Up Wednesdays @ Sugar and Dots
Works For Me Wednesdays @ We Are That Family
Fluster's Creative Muster Link Party @ Fluster Buster
Whatever Goes Wednesdays @ Someday Crafts
Cast Party Wednesday @ Lady Behind The Curtain
Lil Luna Link Party @ Lil Luna's
We Did It Wednesday @ Sew Much Ado
What's It Wednesdays @ Ivy and Elephants
Wonderful Wednesday Blog Hop @ Ducks 'n a Row 
Show and Share @ Southern Lovely
Hookin Up with HoH @ House of Hepworths
Catch a Glimpse Party @ A Glimpse Inside
Thrifty to Nifty @ A Jennuine Life
All Things Thursday Link-Up @ All Things With Purpose
Thursday's Treasures @ Chocolate Chocolate and More!  
Open House Party @ No Minimalist Here
Thursday's Treasures @ Recipes For My Boys
Time Travel Thursday @ The Brambleberry Cottage
Show and Tell Friday @ My Romantic Home
Featured Nest Friday @ French Country Cottage
Craftionary link party @ Craftionary
Create and Share Friday @ Trendy Treehouse
Anything Blue Friday @ The Dedicated House
Nifty Thrifty Sundays @ Nifty Thrifty Things
Think Pink Sundays @ Flamingo Toes
The Weekly Creative Link Party @ The Girl Creative
Sew Darn Crafty @ Sew Many Ways


Saturday, July 13, 2013

Hang Your Laundry To Dry

During the entire month of June, we only used our clothes dryer maybe 5 times.
It was so hot here in southwest Arkansas that I decided 
to hang the majority of our laundry to dry. 
It makes a lot of sense for us:
we have a deck with no shade that gets so hot you cannot walk on it with bare feet, 
and we don't own patio furniture yet. 
Our deck was basically "dead space" that we weren't able to use.
That made me a little sad :-(

I figured, "If it gets that hot out there, why can't I use that to my benefit?"
I'd read a lot about "living green" and using the dryer less to save money and energy,
and these sounded like good things to me!
So my research on clothes drying racks began.
My 3 criteria were that it had to be portable, collapsible, and durable.
This one, which I found on Amazon, is just right.

  photo household_essentials_dryer.jpg
It holds quite a bit of laundry -- just yesterday,
I dried a set of queen sheets, several towels, plus socks on it!
The lines are made of vinyl, and they are quite durable. 
They can be tightened and re-knotted if they become too loose. 
I would say it's my main "work horse" when it comes to drying clothes, 
but it's certainly not the only one. 

 photo DSCF3999.jpg

I have another drying rack that I've owned about 6 years. 
It was actually a wedding gift and was purchased at Wal-Mart. 
It has gotten a bit wobbly over the years, 
but it still has a lot of work left in it. 
Since it's lower to the ground, I don't use it for long items like sheets. 
It does a good job drying bath and dish towels, socks, t-shirts, and undergarments.
This accordion-style dryer folds flat and is a good choice for people with small spaces.
Different versions of it are also available on Amazon, and Wal-Mart probably still sells it, too.

What if you don't have either of these racks, but still want to hang laundry to dry? 
You still have options!
If my DH and I do several loads of laundry in a row and my racks are both full, 
I also hang clothing in the doorways using coathangers
and I love to hang clothes in my upstairs bathroom, too. 
It has a tub/shower combo, and the previous owners updated the shower curtain rod 
to one of the nicer types that gives one more elbow room.
However, when we moved in, I found the old tension shower rods in the basement storage room! 
This is a trick from my granny: 
put an extra shower curtain rod in the center of the shower area and use it for a clothes drying rod.

 photo DSCF4004.jpg

It doesn't impede the shower head or bother anyone showering at all. 
(Unless someone is really tall, in which case it can easily be taken down and replaced later.) 
So handy, and didn't cost me a thing!
Just be sure to balance the clothing evenly along the rod so it doesn't fall down.
I also hang clothes to dry on the towel bar inside the shower,

 photo DSCF4008.jpg

and on the robe hooks outside the shower.

 photo DSCF4005.jpg

Tips for Hanging Laundry to Dry:
  •  Save your time - if you know an item will eventually go on a hanger, hang it to dry that way!
  • Turn colored clothing inside out to dry, since the sun fades things (or hang dry these things inside).
  • You may have to rearrange or refold larger items on the line so they dry evenly.
  • Racks can also be used indoors, too! Great for rainy or humid days.
  • Be sure to shake laundry out before you hang it to minimize wrinkles.
  • Your family may prefer some items to still be dried in the electric dryer due to texture (my DH prefers washcloths and his undershirts go in the dryer).
Do you ever hang laundry to dry? 
Please share any tips or questions you have in the comments! 

Pin It!

This post linked to:
Share Your Creativity @ It's Overflowing!
Serenity Saturday @ Serenity You
  Saturday SHOW-Licious Craft Showcase @ Sewlicious Home Decor
Met Monday @ Between Naps on the Porch
  Amaze Me Mondays @ Dwellings - The Heart of Your Home
Make It Pretty Monday @ The Dedicated House
Mod Mix Monday @ Mod Vintage Life
Sunny Simple Monday @ Sunny Simple Life 
Masterpiece Monday @ Boogie Board Cottage
Mop It Up Monday @ I Should Be Mopping The Floor  
Creative Bloggers' Party @ Homemaker on a Dime  
What'd You Do This Weekend @ Recipes and Ramblings 
Inspire Me Tuesday @ A Stroll Thru Life
The Scoop @ Cedar Hill Ranch
Efforts and Assets Party @ Hickory Trail Blog
  Terrific Tuesdays @ Adventures of a DIY Mom
TOO cute Tuesdays @ Funky Polka Dot Giraffe
Tuesday's Treasures @ My Uncommon Slice of Suburbia
Anti-Procrastination Tuesday @ New Nostalgia
Penny Pinching Party @ The Thrifty Home
Works For Me Wednesdays @ We Are That Family
What I Whipped Up Wednesdays @ Sugar and Dots
Fluster's Creative Muster Link Party @ Fluster Buster
We Did It Wednesday @ Sew Much Ado
What's It Wednesdays @ Ivy and Elephants 
Cast Party Wednesday @ Lady Behind The Curtain
Show and Share @ Southern Lovely
Wonderful Wednesday Blog Hop @ Ducks 'n a Row
Catch a Glimpse Party @ A Glimpse Inside
Thrifty to Nifty @ A Jennuine Life
Time Travel Thursday @ The Brambleberry Cottage
All Things Thursday Link-Up @ All Things With Purpose
Thursday's Treasures @ Chocolate Chocolate and More! 
Hookin Up with HoH @ House of Hepworths
Create and Share Friday @ Trendy Treehouse
Frugalicious Fridays @ Finding Fabulous
Featured Nest Friday @ French Country Cottage
Craftionary link party @ Craftionary

Wednesday, July 3, 2013

Loving My Sunkissed VoxBox!

Disclosure: I received these products complimentary 
for testing purposes from Influenster,
but all opinions are my own.

Y'ALL. 
I cannot tell you how excited I was 
when I found out I was chosen.
Chosen, that is ...
... to receive and review an Influenster VoxBox!  
 
 photo influenster_logo-1.jpg

Yes indeedy, just this past Thursday I was thrilled to open my mailbox, 
and find a sweet little white box full of complimentary summer beauty goodies!
This Sunkissed VoxBox has the perfect name, 
because it's packed with smooth, sunny products  
just for helping you achieve a beautiful look 
now that warm weather is here!

So what's inside? 
Good question! 

 photo influenster_box.jpg
  • Fresh Effects BB Cream by Olay
  • Goody Ouchless elastics
  • Dr. Scholl's For Her High Heel Inserts
  • SinfulColors SinfulShine Nail Polish (color: Spitfire) 
The very first one I reached for was the SinfulColors Nail Polish -- 
the Spitfire color is the sweetest pale purple! 
This polish is formulated for extreme shine with Gel Tech for ultimate gloss, 
and it definitely has a very shiny finish.
There's no "before" picture of my feety-feet-feets for obvious reasons 
(because my toes were truly tragic)
but just get a look of my cute little toes afterwards -- precious, right? 

  photo SinfulShine_GelTech.jpg

Love! 
I did find that the polish seemed a bit thinner in consistency than what I was used to,
but it was still quite easy to apply and I achieved my results in two coats.

SinfulColors SinfulShine Nail Polish is available exclusively 
at Walgreen's for a limited time, only $2.99 a bottle.
With 32 opulent, trend right shades, you're sure to find one you'll like!

Next up was the Fresh Effects BB Cream by Olay! 
I'd only tried BB creams once before, in a different brand, 
so I wasn't really sure what to expect. 

 photo olay_BB.jpg

I found that the consistency of Fresh Effects BB Cream is very light and breathable!
It has a pleasing floral scent that seems clean and crisp without being overwhelming, 
and despite my very sensitive skin, I was not at all irritated. 
On a scale of 1 to 10, I would rate the coverage about a 4.

It functions like a tinted moisturizer with healthy sunscreen (SPF 15),
but if you have acne or skin discolorations, you may still want a bit of concealer (I did).
I really liked that this product was made by Olay, 
because I tend to associate their products with quality skin care.
Definitely will be using Fresh Effects BB Cream all summer 
for days when I just need a light finish on my face 
with the protection of SPF 15 and 24 hour hydration. 
 (Suggested retail: $12.99)

 photo goody_ouchless.jpg

The ponytail is the go-to hairstyle during summertime in the South,
so these Goody Ouchless elastics were right on time! 
And what pretty colors, too - 
the pink and purple immediately stood out to me, 
but I also loved the casual elegance of the pale silver.
(Can a hair elastic be casually elegant? I think so!)

I really like how these are made with a wider, flat elastic and no metal clamp.
You don't know how much you appreciate "ouchless"
until you try to take a ponytail down and strands of hair stay attached to the holder
because they've gotten pinched in the metal clamp. 
Not cool. 
Those days are over for me, though, now that Goody has come to my rescue!
Check out my cute ponytail!

  photo goody_ponytail.jpg

(Suggested retail: $3.99 - 4.99) 

Last in my VoxBox, but certainly not least, 
are the Dr. Scholl's For Her High Heel Insoles.

 photo DrScholls_collage.jpg

Now, anyone who knows me in real life knows that 
I am more of a flats and flip flops kind of girl, 
but I do own a few pairs of heels. 

 photo shoes.jpg

This is my favorite pair: black patent leather, stiletto heel, peep toe.
Yes ma'am! 
They always give me confidence when I wear them.
And foot pain. 
Hate that part, but I had high hopes that Dr. Scholl's For Her could help! 
These inserts are made to fit comfortably in heels 2" and up, 
and immediate and long lasting comfort is guaranteed! 
They accomplish this magic by shifting pressure off the ball of the foot,
and they are made with FabuSTEP Gel. 

I can testify I felt definitely more comfortable in my favorite heels
than usual, so perhaps my stilettos will see a little mileage this summer! 
Thanks, Dr. Scholl's For Her! 
 (Suggested retail: $10.99)

Pin It!


Now that Google Friend Connect is gone,
 I would love to have you follow me
via Bloglovin!
(Button is in top left corner of the blog.)
THANK YOU!