Twitter Facebook RSS Bloglovin Pinterest Instagram Image Map

Friday, November 26, 2010

Card-Making Fun @ Shutterfly!

I love how accessible photography has become for people now that digital cameras have become the norm! Even complex editing processes have become more user-friendly, thanks to online tutorials. Personally, I enjoy digital scrapbooking, emailing pics to family, and creating fun photo projects both for my home and for gifts.

My favorite photo share site is www.shutterfly.com. I've uploaded wedding, honeymoon, vacation, and everyday shots to this site, and I can truly say they make projects a breeze. For example, check out these all-occasion cards I made using my talented husband's gorgeous photography from our 2009 vacation to St. Augustine, FL:

Rough Edge 5x7 folded card
Unique party invitations and greeting cards by Shutterfly.
View the entire collection of cards.

The courtyard of the Lightner Museum is exotic, and easily as beautiful as any of the treasures inside.

Rough Edge 5x7 folded card
Unique party invitations and greeting cards by Shutterfly.
View the entire collection of cards.

We loved the peaceful, spiritual Nombre de Dios Mission and were in awe of this beautiful cross and the lovely landscaping at this historic location.

Rough Edge 5x7 folded card
Unique party invitations and greeting cards by Shutterfly.
View the entire collection of cards.

Castillo de San Marcos is an intimidating 16th century Spanish fort with plenty of architectural detail like this arched doorway and stonework.

These cards are only one example of many gorgeous, easy-to-use templates that Shutterfly offers to turn your pictures into meaningful greetings for any event. Imagine what you could make with family snapshots just in time for Christmas!

Sunday, September 19, 2010

Scents of Autumn -- On a Budget!

I'm noticing a trend that I love to see -- more and more of my fellow bloggers are longing for FALL! Some of this autumn action is taking place here in my corner of Boomtown, too! I've got my fall wreath on the door, my pumpkin doormat ready for visitors, and a cute flag on my porch to round it out. I can't want to buy pumpkins and set up an outdoors vignette with some mums and a cute scarecrow family!

One aspect of fall decorating that we shouldn't forget, however, is the lovely aromas associated with this time of year. Apple cider, pumpkin bread, warm vanilla from sugar cookies, the crisp, earthy scent of colorful leaves -- all of these things can also be represented in our "scent decor," too.

Photobucket

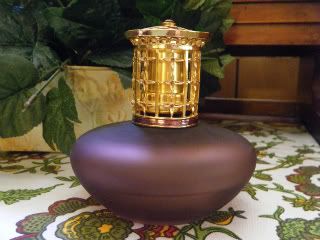
Your options are vast: candles, room sprays, plug-in scent distributors, potupurri, tart warmers, and so on. My personal favorite, however, is the oil effusion lamp. Some of you know these as "Lampe Bergers," which is a trademarked name of one type of these lamps. I received my first, this purple beauty here (a Lampe Avenue lamp) as a wedding gift along with a bottle of La-Tee-Da fragrance.

Photobucket

At first, I was clueless and a little scared to use it, but I did a little searching and found several videos on YouTube that taught me all about it. My first time using it -- WOW. I could not believe how quickly and thoroughly my house was filled with the delicious aroma of spicy orange, and I was completely in love! I learned that effusion lamps also purify the air, instead of just covering odors up, and this was a huge bonus for me because I want the air quality in my home to be as clean as possible.

However, the day soon came that I ran out of fragrance. I trotted down to buy a new bottle, and was shocked to learn that my new love was $12 a pop at my local Hallmark store!

uh oh Pictures, Images and Photos

I felt sad that I might be limited to only using my effusion lamp for short periods of time or on special occasions, but then I snapped out of it and hit up the search engines in hot pursuit of a budget friendly alternative.

Here's where Christy's Thrifty Decorating, a blog I love, saved my skin! Christy did several posts on using effusion lamps and even cracked the code on how to make your own fragrance. Here's her recipe:

16 fl. oz. isopropyl alcohol, 91% (I buy mine @ Walgreen's and Wal-Mart)
0.5 oz. of essential oil (about 1/2 of a 1 fl. oz. bottle)
0.5 oz. of distilled water

Mix right in the rubbing alcohol bottle and use as you would store-bought fragrance. I label mine with a Sharpie and keep them under the cabinet along with my tiny funnels. Do not fill your effusion lamp more than halfway, because it will not burn properly.

** Please note: I am not taking credit for this recipe! All praise should go to Christy :-) Please check her blog out, because she does some amazing things on a dime with Mod Podge and Goodwill finds!

I make my fragrance without the distilled water, because I generally cannot fit it into the rubbing alcohol bottle. I bet some of you might be wondering where the essential oil is purchased. Christy suggested Bramble Berry, and I can confidently recommend them through my own personal experience also. I buy the scents listed under "Fragrance Oils" on their website. But what, you ask, is the difference in price between making your own and buying it? I'm so glad you asked!

16 oz. 91% isopropyl alcohol -- $1.56 @ my Wal-Mart
1 oz. fragrance oil from Brambleberry -- scents range from $2 - $4
Shipping -- $8.50 (FedEx)

But don't forget that you only use half of a 1 oz. bottle of fragrance oil per bottle of 91% rubbing alcohol! I order 8-10 fragrance oils at a time (because I love me some variety!), so my shipping averages out to be about 0.85 to $1.06 per fragrance. Assuming you order 10 oils, with each oil costing you about $3 average, the grand total for each bottle of prepared fragrance is ... $3.91. MUCH better than $12 a pop! Can I get a WOOT WOOT?!

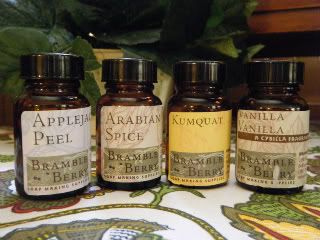
Fragrances I love for fall include Arabian Spice, Applejack Peel, Kumquat, and Vanilla Vanilla.

Photobucket

I'll soon be trying some new ones, like Amber, Buttercream & Snickerdoodle, Pumpkin Pie, and Wassail!

So tell me, visitors -- how do you like to scent your homes for fall, and what methods do you use to get the yummy fragrances in the air?

Thursday, September 9, 2010

A Tale of Two Lamps

After my success with the beachy-chic lamps I remade, I was on the lookout for a pair of lamps for my den, too. My only requirements were that they were inexpensive, 
a good size for a side table, and that they matched. 

I didn't have any luck in my local Goodwill, but my hubby and I found a pair of brass lamps in the Conway Goodwill store on our way home from Ft. Smith back in the spring, and for $6.50 each, I felt they were a good deal.

Side note: do any of you make it a point to visit the thrift stores when you visit larger towns? I love doing this because you get a much larger variety of items! We have a Garmin navigation system, and whenever we travel, my husband knows I love to plug in "Goodwill" as a destination and see how many pop up (patient, patient man!). We visited 6 in Houston alone! Try it sometime :-)

Back to my lamps! These were heavy, real brass. Besides being very yellow, there were some areas of corrosion that I knew would have to be covered. 
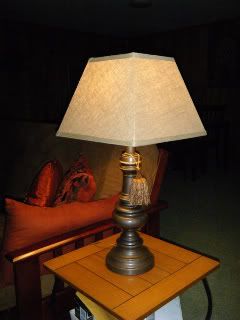
I chose to use Rustoleum's Hammered spray paint in an oil-rubbed bronze finish to both stop the rust and update the finish. I know those of you in Bloggyland love this spray paint, and it worked perfectly for me, too!

Photobucket

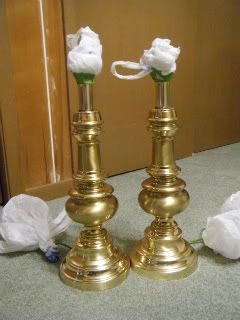
You can see in this "before" shot that I've already taped off the sockets and cords to prep for spray painting.

Photobucket
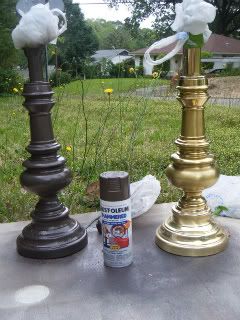
Here's a during shot. Look at the difference one can of spray paint makes! And wow, my grass was really tall! But the flowers/weeds are pretty, right? Tee hee.

Photobucket
Finally, the "after" shot -- much better than brass!

To finish these lamps off, I again chose a $15 Better Homes and Gardens shade from Wal-Mart (I swear I'm not plugging for W-M, but there's honestly few other places to shop around here!), 
but this time in a khaki-colored square shape with a canvas texture.
 I debated using a drum shade again to echo the curves in the lamp base, but I wanted to try something different in this room (since I already used drum shades in the master bedroom), 
and I really like how the warm colors play off one another! 
The tassels were a two-for-$3 deal from Tuesday Morning and they are a fun accent that brings a little flair to my lamps. And honestly, I couldn't make them for a buck-fifty each, so in this case, purchasing them ready-made actually saved me money.

Would I do anything differently with these lamps? Nah, not drastically. 
I love their shape and the oil-rubbed bronze paint color, and for now, the shape of the shades is working for me. I might change 'em up later, but hey -- isn't that the fun of decorating? 
One thing I may do as time goes by is to accent the details on the lamp base with some gold Rub n' Buff, which I've never used but am verrrry curious about. 
I might also add a few charms to my tassels for a bit more personality and punch.

Here are my questions, blog readers! Have you ever used Rub n' Buff? How hard was it? Where did you buy it? Let me know your thoughts and experiences, and have a great Thursday!

Pin It!

I'm participating in

Thrifty Thursday @ Tales from Bloggeritaville

Time Travel Thursday @ Brambleberry Cottage

Show and Share Day @ Just a Girl

Fall Nesting Party @ The Inspired Room

I Made It Without My Hubby @ Shanty 2 Chic

Under $100 Linky Party @ Beyond The Picket Fence

Monday, September 6, 2010

Brownies from a Cake Mix

So-o-o, I was going through the pantry yesterday (in my neverending quest to clean it out) and I found a cake mix I bought last year for my youngest brother's birthday but never used. 
I knew it was near its expiration date and didn't want to waste it (funny, I rarely have this urge with healthy foods), but there wasn't a high demand for cake at my house at the moment.
 However, brownies are always welcome! And plus, with the temps down somewhat and a fall-ish feeling in the air, I've had an itch to bake lately. 
What to do? Hmm. My motto's "Where there's chocolate, I will MAKE a way," so after a quick search, I found this recipe at www.eHow.com. Yummy stuff, people!

Photobucket

Brownies from a Cake Mix

1 moist-style cake mix (mine was a moist chocolate by Pillsbury)
1 stick of butter, melted (channeling Paula Deen here ... )
1 egg
1/2 c. brown sugar
2 T. water
1 c. chopped nuts (I used pecans)
1 10 oz. bag chocolate chips

Preheat oven to 400 degrees. Spray a 9x13 pan with nonstick spray. In a medium bowl, combine butter, egg, cake mix, brown sugar, and water. Beat together with a hand mixer (trust me here, it makes a stiff batter), and then add in the nuts and chocolate chips. Dump this mixture into your pan, and press it in evenly with your hands. Bake 30-35 minutes, or until a crust forms. Allow brownies to cool about 5 minutes before cutting into bars.

Notes from the cook: -- I think I added a bit more than 2 T. water, but not much.
-- I didn't use a whole bag of chocolate chips, and if I had've, I couldn't see these coming out of the pan! I used just under 1 c. that I chopped up along with the pecans, and that was plenty.
-- These turned out a bit greasy. Next time I may reduce butter by 2 T.
-- I will also cut back the brown sugar, too.

Seriously yummy in the tummy! Have you ever made something new or inventive from a packaged product? Tell me about it!

And in honor of Paula Deen, bless her butter-lovin' heart:


Happy cookin', y'all!

Pin It!

I'm participating in:

Metamorphosis Monday @ Between Naps on the Porch

Penny Pinching Party @ The Thrifty Home

Works for Me Wednesday @ We Are That Family

Tuesday, June 1, 2010

Slow Cooker Barbecue Beef Sandwiches

Wow, where did the 3 months between this post and my last one go? Between work and home responsibilities, time sure does fly! I'll try to be more consistent and (eventually) bring you that shabby-beach chic tassel tutorial that I promised oh-so-long-ago.

Memorial Day Pictures, Images and Photos

It's hard to believe that Memorial Day weekend has come and gone another year. This time last year, my husband and I were on vacation in Florida and had made a pit stop at 
the National Naval Aviation Museum in Pensacola (www.navalaviationmuseum.org). 
This was an amazing place to be for such a special holiday to honor our military, and I definitely recommend the visit if you ever have the chance.

This year, however, we were homebodies and had so many little projects going that I wanted to cook something that would be low-maintenance and not require a lot of babysitting. 
We love barbecue, and what better way to enjoy it without the heat or the hassle than by making it in the slow cooker? I know this is an "oldie," but it's definitely also a "goodie." Enjoy!

Slow Cooker Barbecue Beef Sandwiches

Photobucket
Mmm! I am seriously excited about these leftovers, folks!

You will need: 
- 1 roast, about 2.5-3.0 lbs. (I have used chuck roasts and eye of round -- mine was smaller because it's just the 2 of us).

- 1 bottle of BBQ sauce, your choice (I used Wal-Mart's Great Value brand in Honey flavor -- love this stuff and the price is right!)

- Liquid smoke (start with 1/4 to 1/2 tsp. and add to taste)

Spray your slow cooker with nonstick spray and add a thin layer of barbecue sauce to the bottom. Place your roast in, fat-side down, and pour about half the bottle of BBQ sauce over the top. Add liquid smoke, and stir a bit. I usually just use a fork to move the roast around and "swish" the flavoring into the sauce. Cover and cook on low for 6-8 hrs, or high for 3-4 hrs.

Once your roast is done, remove it from the sauce and let it cool. Discard the sauce you cooked it in (it will be very runny at this point, and may have fat floating in it). Shred the roast and put back into slow cooker. I usually put in enough meat so that we can eat once with one round of leftovers, and freeze the extra for another time. Stir in remaining BBQ sauce and another little dash of liquid smoke, cover, heat, and serve!

Pin It!

Photobucket

I'm linked to Crock Pot Wednesdays @ Dining With Debbie! Check out the yummy recipes!

Wednesday, March 10, 2010

OMG! and a Beachy Chic Lamp Redo ...


http://www.thethriftyhome.com

Is it too early to bust out the Sally Field, "You like me, you really like me!" acceptance speech? Yes? Okay. I do want to thank Jen @ The Thrifty Home for featuring me on her 24th Penny Pinching Party -- my very first shout-out! 

And now I want to en-"lighten" you about a nifty, thrify home project I did this past summer -- matching lamps on the cheap for my master bedroom. (Yes, I just said en-"lighten." The cheesy force is strong with this one.)

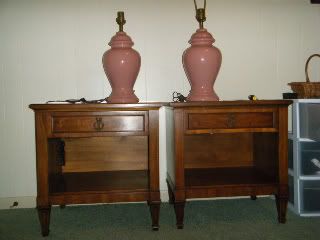
Let's start with our lamps, shall we? These were the dusty rose items in question:

Photobucket

Horrifically 80's, right? But look at the shape -- classic ginger jar, and very versatile. And the price was right: $5 each from Goodwill. Have you SEEN the price of new lamps lately?! It's criminal! For ten bucks, I will take this redo risk!

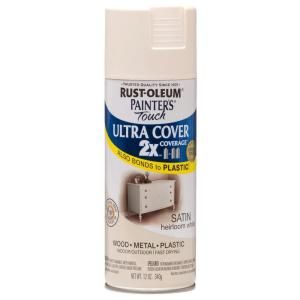
Now, I love pink, but Antique Pepto was not in my shabby-beach chic design scheme, so some bonafide spray paint action took place with the help of blogland's favorite, Rustoleum Heirloom White spray paint in satin finish.

 photo heirloomwhite.jpg
Despite being named Heirloom White, this is actually a rich creamy color 
with no yucky yellow undertone.

Now, I don't have an action shot of me spraying the lamps, but the process is easy peasy. Your prep work is everything, people! First, take your cord and bundle it together with a twist tie. Then, bag it off inside a plastic Wal-Mart or grocery bag, and tape any remaining exposed cord with painter's tape.
 Take a sandwich baggie and cover the socket where your light bulb will go, and tape off any exposed metal in this area that you don't want to get paint on. If your lamp has a switch at the bottom or side, like these lamps have, tape it off also.

At this point, you will have a lovely little bundle that you can spray paint. Use a light hand, but don't go into spasms if drips occur -- some lamps have a very slick surface and it's hard not to have a drip.
For my lamps, I used a very fine sanding block (the finest you can get) to gently rub over my drips once dry, and then I used a lighter hand for the final coat. If you do get paint on your cord or other parts, a little nail polish remover will take it right off.

Now let's look at what we have here:
Photobucket
Thank you for rescuing me!

Major improvement here! I added a $15 Better Homes & Gardens drum shade from Wal-Mart, and the difference is amazing. I chose this shade for the shape, color, and texture (you can't tell in the pic, but the fabric is slightly textured like linen). But where, you ask, is the shabby-beach chic aspect? Well, folks, here it is:

Photobucket
Starfish! Seashells! Antique keys! Are you in love yet???

A precious ocean-themed tassel that I scrapped together in about ten minutes! You likey? Here's the cliffhanger: tutorial to come! Visit me soon for the full details :-)

Pin It!

I'm linked up to:
 "I made it ... without my hubby!" @ Shanty 2 Chic 
Trash to Treasure Tuesdays @ Reinvented.

Wednesday, March 3, 2010

Homemade Laundry Detergent

True confession: I have been making our laundry detergent for over 3 years now. This is generally the kind of revelation that results in many people squinting at me like I'm a wild woman of the mountains who also makes her own moonshine and possum sausage, but that's not the case! (Well, only during a full moon and depending on the price of corn ... kidding, kidding, kidding ...) Anyhow, let me tell you a little bit about my reasons for making laundry detergent, so that even if you never make your own, you understand a bit of the perspective of those that do!
Photobucket
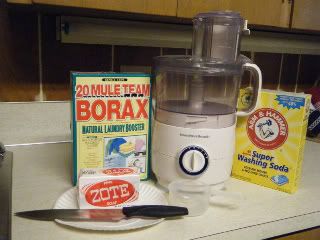
Not pictured: baking soda, which was being a bit of a diva with the whole "No pictures, please!" act. Whateva!

1. Major money saver part 1: ingredients
In my area, bar of Zote soap costs 0.79, baking soda's about 0.45, and borax and washing soda are each about $3.80/box. Now, you won't use an entire box of the borax or washing soda to make one batch (typically one bar of soap will yield 4-6 grated cups of soap in my experience, and only 2 c. are used at a time), but even if you did, your cost would be just $8.80 (will vary by region). Compare this to a box of Tide, Gain, heck, ANYTHING, and you immediately see the cost benefit. One caveat: your savings will be diminished greatly if you cannot find your components locally, so try smaller grocery stores and see if they'll order washing soda (typically the hardest-to-find ingredient) for you.
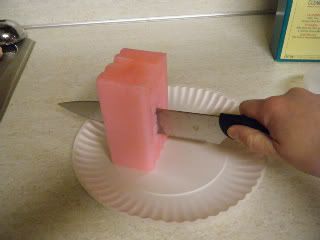
Photobucket
My original caption was gonna be "Et tu, Zote?" but I didn't want to make Shakespeare roll in his grave. I cut my bars in half lengthwise so they fit in the feeder tube of my food processor.

2. Major money saver part 2: concentration
There are no fillers in this detergent and I am able to confidently use no more than 2 tablespoons of the mixture per load, even for my hubby's stinky gym clothes (I love him, but it's true). Compare to the huge cupfuls required by storebought detergent, and it's easy to see that this alternative will last much longer, too. Just for your own comparisons, I wash all clothing in cold water with exception of whites, which are washed in warm. Our water's pretty hard here, and my machine's a top loader. My mother and grandmother have softer water and front loaders, and use the same soap recipe with good results. Works great for delicates, too!
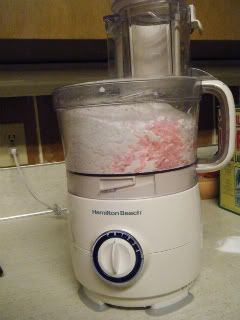
Photobucket
The pile of white stuff on the counter is borax and not Colombia's finest. Ha.

4. Less obnoxious fragrance
The Zote soap I use has a light lemon fragrance that does not irritate my nose like commercial detergents. Now that I am accustomed to my own soap, walking down the detergent aisle in Wal-Mart literally gives me sneezing fits. I also have dry, sensitive skin, and in my own humble opinion, this has been a healthier option for me with less itching and irritation. Your results may vary, of course, and in no way do I uphold my own experience as a substitute for a dermatologist's advice.
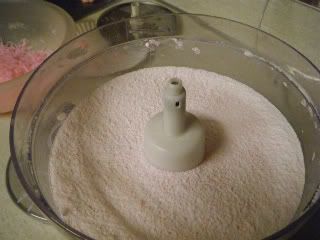
Photobucket
See? Looks just like regular powdered detergent at this point! Except pink!

4. Feeling capable and creative
I am a very tactile person and it's important to me to make things, whether it's food, art, or home improvements. Making the laundry detergent for our little family of 2 makes me feel proud of myself because it's a meaningful way that I contribute to our needs and make wise use of the money we earn. Skills like these are valuable and often taken for granted in our society, which contradicts itself by bemoaning the loss of a "simpler time" while turning its nose up at anything homemade! My own great-grandmother made lye soap from wood ash, and in a small way, this helps me feel connected to earlier generations and times gone by.
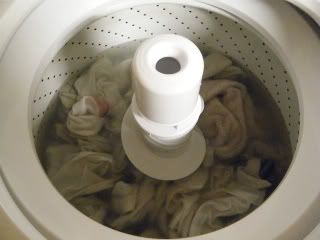
Photobucket
Lest you think this stuff doesn't work, I've included a shot of a load of clothes in my washer -- you can see that it while it doesn't create bubbles, it does release a heck of a lot of dirt into the water. Gross, I know, but I'm just keepin' it real!

Last thoughts:
-- I do use a laundry pretreatment on greasy stains (e.g. Shout). This was also something I had to do when using storebought detergent, however. You can best believe that when my bottle of storebought runs out that I'll be trying a homemade version, though!
-- This mixture works well in front loaders in my family's experience (i.e., use your own best judgment and read your owner's manual) because it does not create heavy suds and result in overflowing.
-- A food processor is not necessary to make homemade laundry detergent! Before I got that one as a wedding gift, I used to plop down with a grater and a bowl in front of the TV and work that soap down into slivers, and then process it in small batches in the blender. If you go this route, you're gonna want more dry ingredients to soap in the blender as you blend so that the soap doesn't blob onto the blades and drive you nuts. Put the dry mix in first, and THEN the soap ... trust me on this one!
-- There are recipes out there for liquid homemade laundry detergent, and I've never tried them just because I don't care to deal with the bottles and a small plastic canister of the dry mix stores far more conveniently in my cabinet. However, many love and swear by this version, and if you're considering it, I encourage you to do a few searches and learn more!

And now, the recipe itself.

Homemade Laundry Detergent
2 C. grated laundry soap (Zote, Fels Naptha, or Kirk's Castile)
1 C. borax
1 C. washing soda
1/2 C. baking soda

Combine all ingredients in a food processor bowl and pulse until combined. Store in an air-tight container. Use 1 T. for small or lightly soiled loads and 2 T. for larger or heavily soiled loads.

Bonus: Fabric Softener
Mix equal parts water and white vinegar and use in your fabric softener dispenser, Downy ball, or spritzed on a washcloth as a dryer sheet.

So what do you think? Could you see yourself making laundry detergent your next DIY project, or is this a "no way!" for you? Leave me a comment and let me know your stance!

Photobucket

Photobucket
I'm linked to Works For Me Wednesday and Penny Pinching Party -- go check these cool ideas out!

Monday, January 4, 2010

Frosted Pinecones

Does taking your Christmas tree and other holiday decor down make you feel a little sad, too? Somehow, once all the twinkle lights and festivity is packed away, it kinda gets to me! This year, as part of my New Year's goal to make my house more of a home, I decided I wanted to decorate more for the seasons. A winter wonderland craft that didn't scream HOLIDAYS!! seemed the perfect thing! So without further ado, I want to share an easy, inexpensive craft to bring a little sparkle back to your home with materials you may already have on hand! Gotta love that winning combo, right?

These would be so cute in your kitchen or den -- really, anywhere you want a touch of winter!

Before:
Pretty, or pretty blah?


After:
Frosty goodness!


You'll need:
pinecones
spackle/joint compound that dries white
cheapie paint brush
clear/irridescent glitter
bowl
paper plates
thin ribbon (if desired)
hot glue gun

First, paint the joint compound onto the pinecone with your brush.


Put your pinecone in the bowl and pour glitter over it.


You can recycle the same glitter by pouring it onto a paper plate and using it again for the next one.
At this point, it'll look like this:


Put it over on the counter to dry (~ 10 minutes). At this point, if you'd like ribbon loops for hanging, cut your thin ribbon into the length you want for loops, and hot glue the ends together. Then squirt a glob into the top of a dry pinecone, and stick the loop in.

Now it'll look like this:


(disregard the Christmas tree in the background, mmkay?)

I am picturing these being so adorable hanging from a bare branch that's been spray painted white, or grouped in a basket, maybe with some rag balls or snowmen! What are your ideas for these little frosted pinecones?


This post is linked to Metamorphosis Monday @ Between Naps on the Porch and to the Before and After Party @ Thrifty Decor Chick