Twitter Facebook RSS Bloglovin Pinterest Instagram Image Map

Tuesday, June 1, 2010

Slow Cooker Barbecue Beef Sandwiches

Wow, where did the 3 months between this post and my last one go? Between work and home responsibilities, time sure does fly! I'll try to be more consistent and (eventually) bring you that shabby-beach chic tassel tutorial that I promised oh-so-long-ago.

Memorial Day Pictures, Images and Photos

It's hard to believe that Memorial Day weekend has come and gone another year. This time last year, my husband and I were on vacation in Florida and had made a pit stop at 
the National Naval Aviation Museum in Pensacola (www.navalaviationmuseum.org). 
This was an amazing place to be for such a special holiday to honor our military, and I definitely recommend the visit if you ever have the chance.

This year, however, we were homebodies and had so many little projects going that I wanted to cook something that would be low-maintenance and not require a lot of babysitting. 
We love barbecue, and what better way to enjoy it without the heat or the hassle than by making it in the slow cooker? I know this is an "oldie," but it's definitely also a "goodie." Enjoy!

Slow Cooker Barbecue Beef Sandwiches

Photobucket
Mmm! I am seriously excited about these leftovers, folks!

You will need: 
- 1 roast, about 2.5-3.0 lbs. (I have used chuck roasts and eye of round -- mine was smaller because it's just the 2 of us).

- 1 bottle of BBQ sauce, your choice (I used Wal-Mart's Great Value brand in Honey flavor -- love this stuff and the price is right!)

- Liquid smoke (start with 1/4 to 1/2 tsp. and add to taste)

Spray your slow cooker with nonstick spray and add a thin layer of barbecue sauce to the bottom. Place your roast in, fat-side down, and pour about half the bottle of BBQ sauce over the top. Add liquid smoke, and stir a bit. I usually just use a fork to move the roast around and "swish" the flavoring into the sauce. Cover and cook on low for 6-8 hrs, or high for 3-4 hrs.

Once your roast is done, remove it from the sauce and let it cool. Discard the sauce you cooked it in (it will be very runny at this point, and may have fat floating in it). Shred the roast and put back into slow cooker. I usually put in enough meat so that we can eat once with one round of leftovers, and freeze the extra for another time. Stir in remaining BBQ sauce and another little dash of liquid smoke, cover, heat, and serve!

Pin It!

Photobucket

I'm linked to Crock Pot Wednesdays @ Dining With Debbie! Check out the yummy recipes!

Wednesday, March 10, 2010

OMG! and a Beachy Chic Lamp Redo ...


http://www.thethriftyhome.com

Is it too early to bust out the Sally Field, "You like me, you really like me!" acceptance speech? Yes? Okay. I do want to thank Jen @ The Thrifty Home for featuring me on her 24th Penny Pinching Party -- my very first shout-out! 

And now I want to en-"lighten" you about a nifty, thrify home project I did this past summer -- matching lamps on the cheap for my master bedroom. (Yes, I just said en-"lighten." The cheesy force is strong with this one.)

Let's start with our lamps, shall we? These were the dusty rose items in question:

Photobucket

Horrifically 80's, right? But look at the shape -- classic ginger jar, and very versatile. And the price was right: $5 each from Goodwill. Have you SEEN the price of new lamps lately?! It's criminal! For ten bucks, I will take this redo risk!

Now, I love pink, but Antique Pepto was not in my shabby-beach chic design scheme, so some bonafide spray paint action took place with the help of blogland's favorite, Rustoleum Heirloom White spray paint in satin finish.

 photo heirloomwhite.jpg
Despite being named Heirloom White, this is actually a rich creamy color 
with no yucky yellow undertone.

Now, I don't have an action shot of me spraying the lamps, but the process is easy peasy. Your prep work is everything, people! First, take your cord and bundle it together with a twist tie. Then, bag it off inside a plastic Wal-Mart or grocery bag, and tape any remaining exposed cord with painter's tape.
 Take a sandwich baggie and cover the socket where your light bulb will go, and tape off any exposed metal in this area that you don't want to get paint on. If your lamp has a switch at the bottom or side, like these lamps have, tape it off also.

At this point, you will have a lovely little bundle that you can spray paint. Use a light hand, but don't go into spasms if drips occur -- some lamps have a very slick surface and it's hard not to have a drip.
For my lamps, I used a very fine sanding block (the finest you can get) to gently rub over my drips once dry, and then I used a lighter hand for the final coat. If you do get paint on your cord or other parts, a little nail polish remover will take it right off.

Now let's look at what we have here:
Photobucket
Thank you for rescuing me!

Major improvement here! I added a $15 Better Homes & Gardens drum shade from Wal-Mart, and the difference is amazing. I chose this shade for the shape, color, and texture (you can't tell in the pic, but the fabric is slightly textured like linen). But where, you ask, is the shabby-beach chic aspect? Well, folks, here it is:

Photobucket
Starfish! Seashells! Antique keys! Are you in love yet???

A precious ocean-themed tassel that I scrapped together in about ten minutes! You likey? Here's the cliffhanger: tutorial to come! Visit me soon for the full details :-)

Pin It!

I'm linked up to:
 "I made it ... without my hubby!" @ Shanty 2 Chic 
Trash to Treasure Tuesdays @ Reinvented.

Wednesday, March 3, 2010

Homemade Laundry Detergent

True confession: I have been making our laundry detergent for over 3 years now. This is generally the kind of revelation that results in many people squinting at me like I'm a wild woman of the mountains who also makes her own moonshine and possum sausage, but that's not the case! (Well, only during a full moon and depending on the price of corn ... kidding, kidding, kidding ...) Anyhow, let me tell you a little bit about my reasons for making laundry detergent, so that even if you never make your own, you understand a bit of the perspective of those that do!
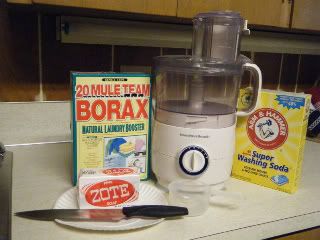
Photobucket
Not pictured: baking soda, which was being a bit of a diva with the whole "No pictures, please!" act. Whateva!

1. Major money saver part 1: ingredients
In my area, bar of Zote soap costs 0.79, baking soda's about 0.45, and borax and washing soda are each about $3.80/box. Now, you won't use an entire box of the borax or washing soda to make one batch (typically one bar of soap will yield 4-6 grated cups of soap in my experience, and only 2 c. are used at a time), but even if you did, your cost would be just $8.80 (will vary by region). Compare this to a box of Tide, Gain, heck, ANYTHING, and you immediately see the cost benefit. One caveat: your savings will be diminished greatly if you cannot find your components locally, so try smaller grocery stores and see if they'll order washing soda (typically the hardest-to-find ingredient) for you.
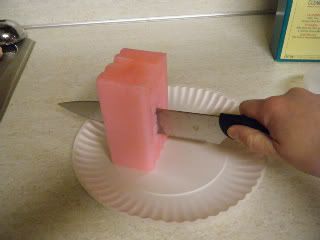
Photobucket
My original caption was gonna be "Et tu, Zote?" but I didn't want to make Shakespeare roll in his grave. I cut my bars in half lengthwise so they fit in the feeder tube of my food processor.

2. Major money saver part 2: concentration
There are no fillers in this detergent and I am able to confidently use no more than 2 tablespoons of the mixture per load, even for my hubby's stinky gym clothes (I love him, but it's true). Compare to the huge cupfuls required by storebought detergent, and it's easy to see that this alternative will last much longer, too. Just for your own comparisons, I wash all clothing in cold water with exception of whites, which are washed in warm. Our water's pretty hard here, and my machine's a top loader. My mother and grandmother have softer water and front loaders, and use the same soap recipe with good results. Works great for delicates, too!
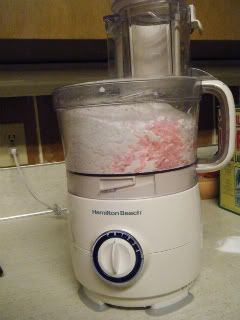
Photobucket
The pile of white stuff on the counter is borax and not Colombia's finest. Ha.

4. Less obnoxious fragrance
The Zote soap I use has a light lemon fragrance that does not irritate my nose like commercial detergents. Now that I am accustomed to my own soap, walking down the detergent aisle in Wal-Mart literally gives me sneezing fits. I also have dry, sensitive skin, and in my own humble opinion, this has been a healthier option for me with less itching and irritation. Your results may vary, of course, and in no way do I uphold my own experience as a substitute for a dermatologist's advice.
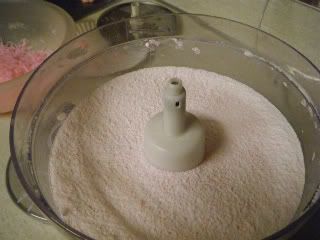
Photobucket
See? Looks just like regular powdered detergent at this point! Except pink!

4. Feeling capable and creative
I am a very tactile person and it's important to me to make things, whether it's food, art, or home improvements. Making the laundry detergent for our little family of 2 makes me feel proud of myself because it's a meaningful way that I contribute to our needs and make wise use of the money we earn. Skills like these are valuable and often taken for granted in our society, which contradicts itself by bemoaning the loss of a "simpler time" while turning its nose up at anything homemade! My own great-grandmother made lye soap from wood ash, and in a small way, this helps me feel connected to earlier generations and times gone by.
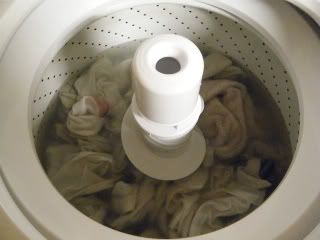
Photobucket
Lest you think this stuff doesn't work, I've included a shot of a load of clothes in my washer -- you can see that it while it doesn't create bubbles, it does release a heck of a lot of dirt into the water. Gross, I know, but I'm just keepin' it real!

Last thoughts:
-- I do use a laundry pretreatment on greasy stains (e.g. Shout). This was also something I had to do when using storebought detergent, however. You can best believe that when my bottle of storebought runs out that I'll be trying a homemade version, though!
-- This mixture works well in front loaders in my family's experience (i.e., use your own best judgment and read your owner's manual) because it does not create heavy suds and result in overflowing.
-- A food processor is not necessary to make homemade laundry detergent! Before I got that one as a wedding gift, I used to plop down with a grater and a bowl in front of the TV and work that soap down into slivers, and then process it in small batches in the blender. If you go this route, you're gonna want more dry ingredients to soap in the blender as you blend so that the soap doesn't blob onto the blades and drive you nuts. Put the dry mix in first, and THEN the soap ... trust me on this one!
-- There are recipes out there for liquid homemade laundry detergent, and I've never tried them just because I don't care to deal with the bottles and a small plastic canister of the dry mix stores far more conveniently in my cabinet. However, many love and swear by this version, and if you're considering it, I encourage you to do a few searches and learn more!

And now, the recipe itself.

Homemade Laundry Detergent
2 C. grated laundry soap (Zote, Fels Naptha, or Kirk's Castile)
1 C. borax
1 C. washing soda
1/2 C. baking soda

Combine all ingredients in a food processor bowl and pulse until combined. Store in an air-tight container. Use 1 T. for small or lightly soiled loads and 2 T. for larger or heavily soiled loads.

Bonus: Fabric Softener
Mix equal parts water and white vinegar and use in your fabric softener dispenser, Downy ball, or spritzed on a washcloth as a dryer sheet.

So what do you think? Could you see yourself making laundry detergent your next DIY project, or is this a "no way!" for you? Leave me a comment and let me know your stance!


Photobucket

Photobucket
I'm linked to Works For Me Wednesday and Penny Pinching Party -- go check these cool ideas out!

Monday, January 4, 2010

Frosted Pinecones

Does taking your Christmas tree and other holiday decor down make you feel a little sad, too? Somehow, once all the twinkle lights and festivity is packed away, it kinda gets to me! This year, as part of my New Year's goal to make my house more of a home, I decided I wanted to decorate more for the seasons. A winter wonderland craft that didn't scream HOLIDAYS!! seemed the perfect thing! So without further ado, I want to share an easy, inexpensive craft to bring a little sparkle back to your home with materials you may already have on hand! Gotta love that winning combo, right?

These would be so cute in your kitchen or den -- really, anywhere you want a touch of winter!

Before:
Pretty, or pretty blah?


After:
Frosty goodness!


You'll need:
pinecones
spackle/joint compound that dries white
cheapie paint brush
clear/irridescent glitter
bowl
paper plates
thin ribbon (if desired)
hot glue gun

First, paint the joint compound onto the pinecone with your brush.


Put your pinecone in the bowl and pour glitter over it.


You can recycle the same glitter by pouring it onto a paper plate and using it again for the next one.
At this point, it'll look like this:


Put it over on the counter to dry (~ 10 minutes). At this point, if you'd like ribbon loops for hanging, cut your thin ribbon into the length you want for loops, and hot glue the ends together. Then squirt a glob into the top of a dry pinecone, and stick the loop in.

Now it'll look like this:


(disregard the Christmas tree in the background, mmkay?)

I am picturing these being so adorable hanging from a bare branch that's been spray painted white, or grouped in a basket, maybe with some rag balls or snowmen! What are your ideas for these little frosted pinecones?


This post is linked to Metamorphosis Monday @ Between Naps on the Porch and to the Before and After Party @ Thrifty Decor Chick