Twitter Facebook RSS Bloglovin Pinterest Instagram Image Map

Monday, June 24, 2013

Spray Painted Canisters

Hey everybody!
I'm still plugging along with my low-to-no cost kitchen decorating, 
and I have a really cool project to show you!

Spray painted kitchen canisters to perfectly match my rugs!
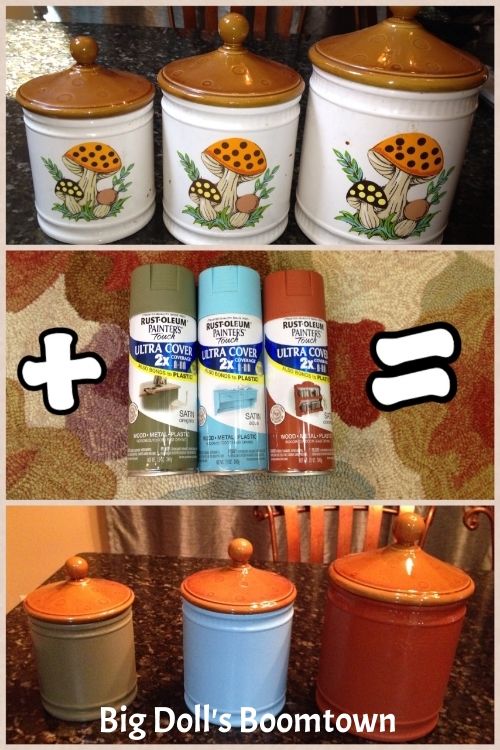
 photo canisterscollage.jpg
I got two kitchen mats like this at Garden Ridge back in April, 
because I loved the color combo and the design.
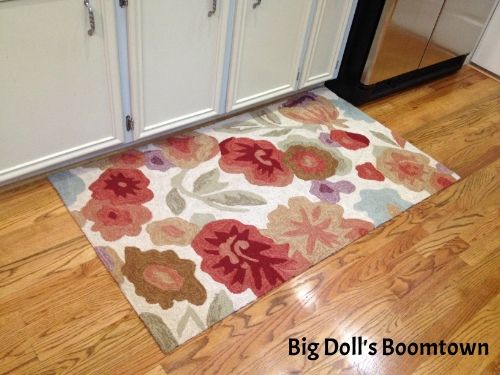
 photo inspirationrug.jpg
They were each about $50, so $100 total, 
but I bought them with money I earned selling stuff I didn't need on Facebook,
 so they were actually no out-of-pocket cost to me. 
That's the way (uh huh, uh huh) I LIKE it :-)

I knew I could bring warmth to the kitchen if I just pulled the colors from the rugs,
so my first step was to choose 3 colors from the rug and buy spray paint to match.
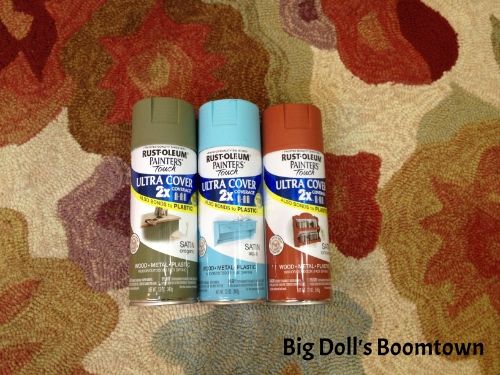
 photo rugspraypaint.jpg

I picked 2 colors I didn't have much of in my house (orange and aqua), plus a neutral (sage). 
Red and purple are two of my favorite colors, so there's plenty of
 stuff I already own that I can decorate with (which, ahem, shall be a post to itself).

Next step was to go to Goodwill! Also known as my mother ship ... 
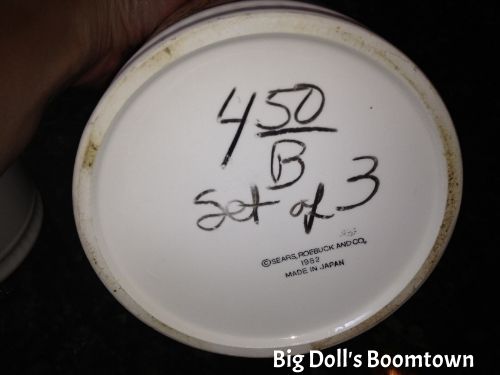
I totally lucked out and found this set of kitchen canisters for only $4.50 total -- eep!!
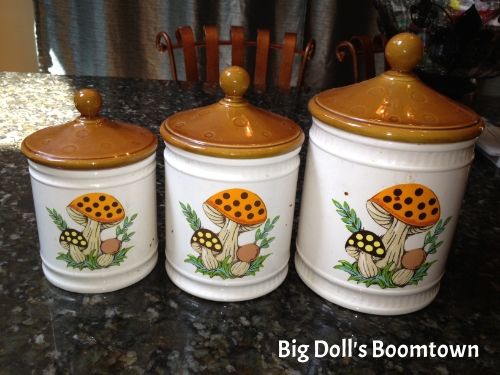
 photo canistersbefore.jpg

 photo canistersprice.jpg
They are over 30 years old, and the pattern is "Merry Mushroom." 
Turns out they were sold by Sears Roebuck in the early '80's.
Plenty of sets on eBay if this is your style -- I think the mushrooms are cute, 
but not the look I was going for.
Since these have brown lids, I didn't even have to spray paint 'em.
 Heh - score lazy points for ME. 

After I scrubbed the canisters with hot, soapy water, and dried them thoroughly,
I kinda went overboard on my paint prep and taping these canisters off.
I didn't want paint inside them (to keep them food safe) or on the bottoms 
(goodness forbid they should stick to a surface).
So I taped the entire bottoms of all 3 off,
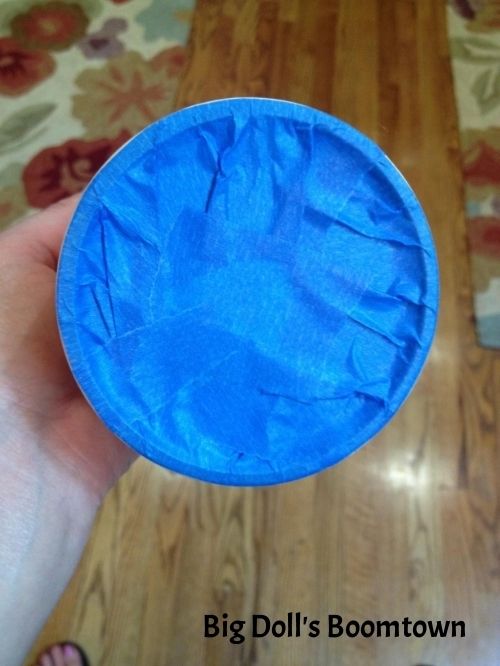
  photo tapedbottoms.jpg

 and then taped the inside edge plus taped a sandwich baggie
inside each to prevent spray paint from getting inside.
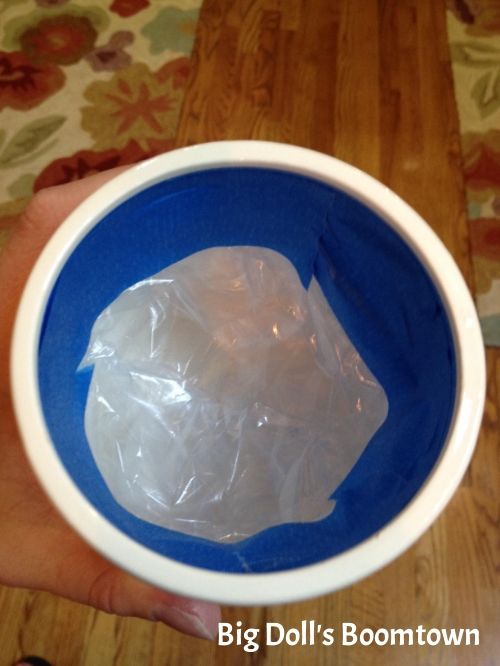
 photo tapedinsides.jpg
It took a while, but it was worth it. 

Now, I have done a Lot of spray painting, but I made a horrible, no-good mistake 
because I was SO excited to get started on these canisters.  

... I spray painted on a really humid day.
Like, it had JUST stopped raining. I know, I know.
My paint did not want to dry well, and the edges stayed tacky forever. 
Cannot tell you how many times I had to respray parts that I messed up 
when I thought they were dry and touched them to try to move them.
I seriously felt like I had ruined the whole set. 
Lesson learned: nevah-evah-evah use spray paint when it's damp outside!

But all's well that ends well, and finally I brought them inside for a little glazing. 

Already looking pretty good, huh? 

 photo canisters.jpg

Anyhoo.
I will now share with you the high tech, top secret method in which I glaze things:
mix water and a little brown acrylic craft paint (not too runny),
and sponge on with a paper towel. Let dry.
Yes, that is it.

The effect is very subtle -- the brown glaze just mutes the colors a bit
so they blend better with the tones in the rug. 

 photo b602cd93-63ef-4997-9c5b-7347e216e64b.jpg

What do you think? I think I lovvvve 'em!
So cute, so easy, and so inexpensive :-)
A perfect custom match to my inspiration rugs, too!

I would love for you to become my newest follower
so you can watch my kitchen's progress!

Pin It!

This week I'm partying with:

Amaze Me Mondays @ Dwellings - The Heart of Your Home
Mod Mix Monday @ Mod Vintage Life 
Masterpiece Monday @ Boogie Board Cottage 
Mop It Up Monday @ I Should Be Mopping The Floor  
Creative Bloggers' Party @ Homemaker on a Dime  
What'd You Do This Weekend @ Recipes and Ramblings 
Inspire Me Tuesday @ A Stroll Thru Life
The Scoop @ Cedar Hill Ranch 
One Project At A Time @ A Bowl Full Of Lemons
Efforts and Assets Party @ Hickory Trail Blog
Get Your Craft On Tuesdays @ Today's Creative Blog 
Terrific Tuesdays @ Adventures of a DIY Mom 
Tuesday's Treasures @ My Uncommon Slice of Suburbia 
Penny Pinching Party @ The Thrifty Home
Works For Me Wednesdays @ We Are That Family
What I Whipped Up Wednesdays @ Sugar and Dots
Whatever Goes Wednesdays @ Someday Crafts
Fluster's Creative Muster Link Party @ Fluster Buster
Cast Party Wednesday @ Lady Behind The Curtain
We Did It Wednesday @ Sew Much Ado
What's It Wednesdays @ Ivy and Elephants
Show and Share @ Southern Lovely
Wonderful Wednesday Blog Hop @ Ducks 'n a Row 
Catch a Glimpse Party @ A Glimpse Inside
Hookin Up with HoH @ House of Hepworths
Thrifty to Nifty @ A Jennuine Life 
Time Travel Thursday @ The Brambleberry Cottage 
All Things Thursday Link-Up @ All Things With Purpose 
Thursday's Treasures @ Chocolate Chocolate and More!  
Open House Party @ No Minimalist Here 
Thursday's Treasures @ Recipes For My Boys 
Frugalicious Fridays @ Finding Fabulous
Craftionary link party @ Craftionary
Show and Tell Friday @ My Romantic Home
Featured Nest Friday @ French Country Cottage
Create and Share Friday @ Trendy Treehouse
Frugal Friday's @ Shabby Nest
TGIF Linky Party @ Living Better Together
 Pity Party @ 30 Hand Made Days
Share Your Creativity @ It's Overflowing
From the Farm Blog Hop @ Sunny Simple Life
 Party Junk @ Funky Junk Interiors

Monday, June 17, 2013

Kitchen Wall Vinyl

Remember how I told you about my kitchen needing a punch of decoration and interest?
Well, this is the first step I took in banishing the "meh" and trying to make things spicy!

One day, I looked over my sink and the apron of cabinetry over the sink just seemed extra bare. It bothered me, so I started brainstorming things I could hang up there.

 photo kitchen2.jpg

Some ideas I had were:

- wrought iron scrollwork
- skinny wood or metal vintage looking sign
- pennant banner

Any of these options would have been pretty, but I hit a wall with each
when I tried to figure out how I would hang them up there.
I was really reluctant to drive nails into the cabinetry, even though the previous homeowner did,
and I was concerned that a 3-M command hook might stick out farther than I wanted.

Finally, it hit me: a vinyl wall decal! 

 photo ead06aa5-963b-40c9-af4a-30c9aecfa103.jpg
Ta-daaaaaahhh :-)

I spent less than $10 on this "Bon Appetit" decal on eBay, with free shipping, too.
 It helped that I needed a small vinyl decal and that I selected a design already offered,
because these factors kept my price low.

It took me right around 15 minutes to add a little beauty to this area, and
if I ever change my mind and need to remove the decal, I can heat the vinyl
with my hair dryer and peel it up without harming my paint.

If you've never applied one of these before, my advice is to start small and simple.
You'll need a measuring tape to mark both the horizontal and vertical middles
of your wall space and your vinyl's paper backing.
You'll also need a level to be sure your design is not only centered on the wall,
but also not "whomperjawed" (trademark: my mother) and crooked.
To apply the vinyl, you'll need a stiff plastic tool (use an old gift card) to burnish it onto the wall.

Here is a YouTube video, courtesy Lucid Graphics,
that offers a great visual of the same"horizontal hinge" method I used.
The only thing I want to add is to be sure to check your design is level on the wall
before you remove the paper backing and rub it on.


Thanks for checking out my "Bon Appetit" vinyl art,
and keep watching for my newest thrifty kitchen updates!

Pin It! 
 
 This post linked to:
Met Monday @ Between Naps on the Porch
Amaze Me Mondays @
Dwellings - The Heart of Your Home
Make It Pretty Monday @
The Dedicated House
Mod Mix Monday @
Mod Vintage Life 
Sunny Simple Monday @ Sunny Simple Life  
Mop It Up Monday @ I Should Be Mopping The Floor 
 What'd You Do This Weekend @ Recipes and Ramblings
 Inspire Me Tuesday @ A Stroll Thru Life
The Scoop @ Cedar Hill Ranch 
One Project At A Time @ A Bowl Full Of Lemons 
Efforts and Assets Party @ Hickory Trail Blog 
Get Your Craft On Tuesdays @ Today's Creative Blog
Terrific Tuesdays  @ Adventured of a DIY Mom  
TOO cute Tuesdays @ Funky Polka Dot Giraffe
Tuesday's Treasures @ My Uncommon Slice of Suburbia   
Penny Pinching Party @ The Thrifty Home
Anti-Procrastination Tuesday @ New Nostalgia
Works For Me Wednesdays @ We Are That Family
What I Whipped Up Wednesdays @ Sugar and Dots
Whatever Goes Wednesdays @ Someday Crafts 
Fluster's Creative Muster Link Party @ Fluster Buster
 Lil Luna Link Party @ Lil Luna 
Cast Party Wednesday @ Lady Behind The Curtain 
We Did It Wednesday @ Sew Much Ado
What's It Wednesdays @ Ivy and Elephants 
Show and Share @ Southern Lovely  
Wonderful Wednesday Blog Hop @ Ducks 'n a Row
All Things Thursday Link-Up @ All Things With Purpose
Catch a Glimpse Party @ A Glimpse Inside
Thursday's Treasures @ Chocolate Chocolate and More! 
Open House Party @ No Minimalist Here
Thursday's Treasures @ Recipes For My Boys
Loves on a Thursday @ Imprintalish
 

Monday, June 10, 2013

How to Decorate Your Kitchen!


Hey hey! I want to show you a work in progress - my kitchen! 
I love my kitchen, but decorating it is sort of a pain 
because there isn't much wall or counter space. 

This is not a major reno - just a little accessorizing on a budget!
Everything is already nice, neutral, and in good shape ... 
hmm, sounds like a starting point!

The challenge becomes, 
"How do I add color and personality to this space
while keeping it functional and not full of clutter?" 

Taking pictures of the area was my solution.

You know how sometimes a picture of something
reveals things you didn't notice when you were right in front of it?
Like outfits you thought were flattering ... or does that only happen to me ;-)

I took pics of my kitchen and
used a free iPhone app, Aviary, to help me see what I'd missed! 
I used the "draw" function to circle the "empty" or "problem" zones,
and used "text" to add little notes about what I'd like to see there.

Like this!

 photo kitchen1.jpg


 photo kitchen2.jpg
All those dishes are clean ... just keeping it real!

 photo kitchen3.jpg

Cool, huh?
  •  What if decorating is not your talent?
Text or email those pics to a friend or family member who does have "the touch," and see what they suggest!
  • What if you don't have an iPhone? 
Take digital pictures and open them in MS Paint, where you can also use "draw" and "text" options to highlight areas.

Taking and critiquing pictures of your space could also guide your shopping for a project!
I hate having a vague idea of what I am looking for,
and really don't want to waste money on duds that turn out wrong.
Just a quick look at my "cheat sheet" pics, and problem solved :-)

I've actually already made a few changes to my kitchen, inspired by my pics,
using either things I already had (woohoo!) or got for a little of nothing!
You'll have to check out my changes in the next update!

Pin It!

This week, I'm partying with:

Met Monday @ Between Naps on the Porch
Amaze Me Mondays @ Dwellings - The Heart of Your Home
Make It Pretty Monday @ The Dedicated House
Mod Mix Monday @ Mod Vintage Life
Sunny Simple Monday @ Sunny Simple Life 
 Inspire Me Tuesday @ A Stroll Thru Life
The Scoop @ Cedar Hill Ranch 
Terrific Tuesdays @ Adventures of a DIY Mom
Get Your Craft On Tuesdays @ Today's Creative Blog
TOO cute Tuesdays @ Funky Polka Dot Giraffe
Tuesday's Treasures @ My Uncommon Slice of Suburbia
Anti-Procrastination Tuesday @ New Nostalgia
Penny Pinching Party @ The Thrifty Home
Works For Me Wednesdays @ We Are That Family
What I Whipped Up Wednesdays @ Sugar and Dots
Whatever Goes Wednesdays @ Someday Crafts 
Fluster's Creative Muster Link Party @ Fluster Buster
 Lil Luna Link Party @ Lil Luna 
Cast Party Wednesday @ Lady Behind The Curtain 
We Did It Wednesday @ Sew Much Ado
What's It Wednesdays @ Ivy and Elephants 
Show and Share @ Southern Lovely  
Wonderful Wednesday Blog Hop @ Ducks 'n a Row 
Party Time @ The 36th Avenue

Hookin Up with HoH @ House of Hepworths
Thrifty to Nifty @ A Jennuine Life
Time Travel Thursday @ The Brambleberry Cottage
All Things Thursday Link-Up @ All Things With Purpose
Catch a Glimpse Party @ A Glimpse Inside
Thursday's Treasures @ Chocolate Chocolate and More! 
Open House Party @ No Minimalist Here
Thursday's Treasures @ Recipes For My Boys
Loves on a Thursday @ Imprintalish

Monday, May 20, 2013

Bar-B-Cups

 photo 444ef1d8-1863-492b-87c3-b8a04c181fdc.jpg

Oh my goodness, it is getting hot already here in South Arkansas! I find myself standing in front of the pantry, befuddled and wondering what I can make for dinner that won't be too "heavy." Even though this recipe requires use of the oven, it is close to a finger food and thus came to my mind. Bar-B-Cups!

These babies are far from gourmet, and instead just fun comfort food. When I was a kid, I used to lose my mind when my mom made these things, because I was pretty sure they were the coolest ever. Turns out, they're originally from a Pillsbury Bake-Off Contest in the 1950's, and the recipe was submitted by a guy to boot! So it goes without saying that these are Man Approved, Kid Approved, and just plain good football food, too! Yes, even as summer begins to cook us here in the South, my mind still strays to college football, even though I understand the game not one bit ... blame it on my Southern-ness and blame it on the SEC, I just cannot help it.

Enough talking. Here's what you need:

Bar-B-Cups

1 can of jumbo butter biscuits (8 count)
1/2 lb. ground beef or turkey, browned (I brown the whole pound and freeze the other half for later.)
1/4 - 1/3 c. barbecue sauce
1/2 c. shredded cheese (I use a colby-jack blend)


Preheat oven to 350. Open the can of biscuits and flatten each one to a circle about 5"-6" wide. Press each circle into the cup of a muffin tin, being sure to pinch a little of the dough over the top. Add barbecue sauce to the browned ground beef until it's a scoopable consistency, adding any other desired seasonings (I sometimes add a little liquid smoke, hot sauce, or ketchup, depending on my BBQ sauce). Add a spoonful of meat mixture to each biscuit dough cup, keeping in mind that if you add too much, it may overflow as the dough on the bottom rises and bakes. Bake 15-17 minutes, sprinkling shredded cheese over the top in the last few minutes to melt.

 photo 71c2214c-b466-4e4c-8850-1b35c75ae5a2.jpg

Mmm.

Bar-B-Cups are very yummy served with baked beans, salad, macaroni and cheese, or a nice little side veggie. They reheat well, and could probably be frozen once baked, but save the shredded cheese for when you reheat them if you go this route.

Other filling ideas:
- tuna melt mixture
- chicken pot pie mixture
- sloppy joe meat
- beef stew
- pie filling
- leftover spinach dip
- taco meat mixed with refried beans, salsa, even a little rice!

Try them and see what you and your family think!


Pin It!

This post linked to:

Inspire Me Tuesday @ A Stroll Thru Life
Works For Me Wednesdays @ We Are That Family
Penny Pinching Party @ The Thrifty Home
Catch a Glimpse Party @ A Glimpse Inside
Hookin Up with HoH @ House of Hepworths
Doggone Dirty Craftin Linky Party @ Rhinestone Beagle
Recipe Round Up @ Gooseberry Patch 
Thursday's Treasures @ Chocolate Chocolate and More! 
Thursday's Treasures @ Recipes For My Boys

Wednesday, April 24, 2013

Beach Bathroom Decor - Seashell Shadowbox

**UPDATE!!** My Seashell Shadowbox was featured on the 149th Hookin Up with HoH Party!
THANK YOU, Allison -- you rock my socks!  

And now back to our regularly scheduled programming ...

 photo frame8.jpg

Hey everyone! I made some artwork for our beach themed master bath a while back and wanted to share my how-to tips. "Beach themed? But Melody, you live in a land-locked state ..." I know, I know, but I love the ocean and earth tones combined with shades of blue, and the results (while a work in progress) make me happy when I am in there. This is a really versatile project and could be customized beyond my beach theme and placed in any room of the house to complement your own color scheme. Let's get going!

 photo frame1.jpg

I started with this $3 frame bought from my neighbor's garage sale -- great deal, plus it's Pottery Barn! I cleaned it up well, removed the back, and took out the glass and set it aside. The mat, with its 3 openings, was what really drew me to this frame. For some reason, they made me think, "Melody! Would this not be SO COOL if you made it a shadowbox?!" I had seen framed seashells before, and had a nifty little collection of my own that DH and I bought on vacation in Hilton Head, SC, that I could raid for this project. I know it's not a true shadowbox, but I knew it could be really pretty and unique all the same.

 photo frame2.jpg

I knew I needed something as a backer to both accent my shells and pick up the color scheme in my valance and bathmats. Scrapbook paper is cheap, and I have plenty of it, so that was an easy decision. I know some people have trouble selecting colors, so let me show you how I did mine. I picked three shades of blue that I felt were strong contenders, based on the colors I already have in the room, and I just held them up 'til one stood out to me more than the others.

Like this:

 photo frame3.jpg  
Comparing to the valance ...

 photo frame4.jpg
 ... annnnd, comparing to my bathmat.

I could see pretty quickly that the blue-green was my best option -- the far left color was too dark, and the center color didn't pick up the aqua tones -- so I folded the 12x12" sheet of paper in half, and cut it with scissors along the crease line. I just eyeballed the size I'd need for each opening, cut it roughly into thirds, and hot glued each one in place from the back.

 photo frame5.jpg
You could totally use tape also, especially if you wanted to reuse the mat at a later time.

From this point, I had to decide whether I wanted this frame to be oriented horizontally or vertically. I laid the shells on each paper section first while it lay horizontally ...

 photo frame6.jpg

 photo frame7.jpg

... and then rearranged them when I flipped it vertically. Either way would've been great, but the horizontal version looked the best to me. When I arranged my shells, I chose 3 that were about the same size, but different shapes. Since the pencil starfish and sand dollar were both completely white, I used them to "sandwich" the striped shell in the middle and sort of make a pattern - light, dark, light. That sort of arrangement tends to be interesting to the eye and keeps the design balanced. After I was satisfied with my arrangement, I applied a few globs of hot glue to the back of each shell and eyeballed the placement in about the middle of each square. And that's IT!

 photo a53d9009-48e6-4300-befd-b5c880ee76dd.jpg

Doesn't it look awesome in my potty nook? I wish I could claim to have made the beautiful grass and shell wreath above the Seashell Shadowbox, but this was a souvenir purchased at The Shell Shop, also in Hilton Head, SC. I'd wanted to make one, and had a plan to hand-pick each shell I'd use and blah-blah-blah (you have to imagine the "blah-blah-blah" being said in my DH's voice), but the larger, prettier shells were $6-$8 each, not counting what I'd spend for the wreath base, filler, etc, and I saw quickly that just buying the wreath pre-made was a better bet! I think it cost about $28, and I love it.

What do you think of my seashell shadowbox? Could you see yourself making something like it?

Pin It!

This post linked to:
Inspire Me Tuesday @ A Stroll Thru Life
Works For Me Wednesdays @ We Are That Family
Penny Pinching Party @ The Thrifty Home
Catch a Glimpse Party @ A Glimpse Inside
Hookin Up with HoH @ House of Hepworths
Doggone Dirty Craftin Linky Party @ Rhinestone Beagle
Catch a Glimpse Party @ A Glimpse Inside
Thursday's Treasures @ Chocolate Chocolate and More! 
Thursday's Treasures @ Recipes For My Boys

Thursday, October 4, 2012

Glade Expressions (R) Collection


I want to tell you all about a new home fragrance collection that DH and I have been enjoying, courtesy of my participation as a BzzAgent for the Glade Expressions(R) Collection. The Glade Expressions® Collection is inspired by art and designed to be left out on display. Hel-LO, this means I no longer have to scramble to hide those hideous metal cans of aerosol air freshener whenever unexpected company pops by! These authentic, easy-to-use home fragrance products release scents that open up note by note, filling your home with lightly layered fragrances and inviting life in.

The breakthrough line includes two unique, refillable products:

Glade Expressions® Fragrance Mist comes in a chic holder that blends with your décor for a burst of fragrance that's always out and available. Simply squeeze to release a long-lasting, light mist of fragrance; then refill the holder with your favorite true-to-life scent.

DH and I are totally loving the Cotton and Italian Mandarin fragrance mist -- it's a scent like fresh laundry with a subtle citrus twist, and it just resonates clean, calm, and cozy. Although I gotta say, as much as I love this scent, I can't wait to refill the sleek white holder with another one! What can I say ... I love options, and I love yummy smells :-) Unlike many aerosol room sprays I've tried, these scents don't have an overbearing, fake aroma that becomes cloying. Let me tell you, we have pets, and honey, I've tried every spray you could imagine. This Glade Expressions mist is light, but lasting and effective.

The Glade Expressions® Oil Diffuser releases authentic and exotic fragrances without having to plug it in or find batteries. The trendy holder matches décor perfectly - and is also refillable - making it an effective, stylish option for layering true-to-life fragrances in all of your living spaces.

They had me when they said "no batteries." Easy peasy, lemon squeezy! I chose the Pineapple Mangosteen fragrance and was intrigued by the design of the bamboo diffuser with graceful leaves carved in the wood. What a pretty and unique accent to my decor, and I love that it's doing double duty by releasing an authentic fresh-fruit smell to make our family room welcoming.

Wanna know more about the Glade Expressions(R) fragrance options? Uh, of course you do! Here's whatcha got:

Cotton & Italian Mandarin - Open your home with the bright, breezy blend of cotton and sparkling citrus, honeydew and sandalwood (mist only)

Fuji Apple & Cardamom Spice - A ripe, spicy blend of sweet pears and crisp apple with a dash of cinnamon and clove that warms and invigorates

Lavender & Juniper Berry - Lush lavender blends with fresh juniper berry, eucalyptus and rose to relax the senses and open your home

Pineapple & Mangosteen - Evoke a tropical paradise with the blend of freshly cut pineapples and hint of tangy mangosteen, creamy coconut and passionflower

I can't wait to try the Fuji Apple and Cardamom Spice for the holidays, and Lavender and Juniper Berry sounds perfect for a guest bedroom or even our master bath. Go check these out, folks -- you know you have a space in need of a fabulous new fragrance, and these are just right!

Full Disclosure: I'm a BzzAgent and I received Glade Expressions(R) Collection coupons from BzzAgent.com that enabled me to experience the mist and oil diffusers.

Sunday, September 18, 2011

Goodwill Quickie Redo!

Photobucket

No "before" pic -- sorry, y'all! I found this cute chicken wire basket with a red gingham liner at my Goodwill for $2. The "Breads" plaques on either side were smudged and dirty, and I wanted to repurpose it for storage in the office/craft room. What to do?

Photobucket

First, I looked closely at the basket to figure out how the plaques were attached. They seemed to be wired on through tiny holes drilled at top center and bottom of each circle.

They were easily removed, and I pulled out my trusty fleur de lis stamp and Stayz On permanent ink 
to add a new design to the blank back sides of the plaques. 

I really like clear acrylic stamps for when placement is key -- makes it soooo much easier to line things up. Got both the ink pad and the stamp at Michaels. Magnifique!

Now for reattaching the plaques :-) The existing wire was too brittle and broke as I removed it, so to replace it without spending money, I stripped the paper off some bread bag ties and used that wire -- perfect fit! This is one of my favorite frugal tips for crafting -- just soak a paper bread bag tie in water and then use your fingernails to scrape the wet paper off. The resulting wire is helpful for a lot of things: small jewelry repairs, adding ornaments or small decorative items to Christmas garland, etc.

This little project gave me a finished product in less than 15 minutes and the basket looks great sitting on the bookshelves in the office/craft room holding blank CDs, staples, etc. Cute AND easy -- I like it!


Pin It!